
Movies & Scenes
RayMol features a dedicated timeline movie studio and an expanded scene system. You can capture camera keyframes, interpolate between complex visual states, play back multi-state NMR and molecular dynamics trajectories, and export publication-quality animations directly on macOS, iPadOS, and iPhone.
Scenes in RayMol
Section titled “Scenes in RayMol”A PyMOL scene is a comprehensive visual snapshot. While classic PyMOL scenes only captured camera position, atom colors, and representations, RayMol extends scenes to capture the complete rendering and physical environment.
What a scene stores
Section titled “What a scene stores”When you store a scene in RayMol, it captures:
- Camera & view: Focal length (lens), magnification (zoom), orientation, clipping planes, and perspective versus orthographic projection.
- Molecular representations & styles: Visible representations (cartoon, sticks, spheres, surface), per-atom colors, and transparency overrides.
- Render “look” settings: Real-time ray tracing, ambient occlusion, shadows, outlines and contour widths, depth cueing (fog), tonemapping, and exposure.
- Materials and transparency settings: The default scene material,
per-object and per-representation materials (
cartoon_material,surface_material,stick_material,sphere_material), and transparency settings (transparency_peel). - Object placement (Move mode): 3D position and orientation transforms
applied to individual objects via Move mode (
⌃M). - Autofocus target: The active
dof_focusselection used by depth of field autofocus. - Studio lights & atmosphere (beta): The complete studio lighting rig (up to six spot lights, custom colors, warmths, beams, and shadows) and atmospheric haze and dust parameters.
When you recall a scene, RayMol restores every setting and object placement without altering uncaptured aspects of your session.
Manage scenes
Section titled “Manage scenes”Open the Scenes tab in the inspector:
- Store a scene: Select the
+chip to snapshot the current state into a new scene. - Recall a scene: Select any scene chip to immediately apply its view, representations, materials, and lighting rig.
- Update: Select Update to overwrite the active scene with your current viewport settings and camera position.
- Reorder: Drag and drop scene chips to change their presentation sequence.
- Step through scenes: Use Prev and Next to step through scenes in order.
- In-viewport scene buttons: Turn on Show scene buttons in viewport to pin glanceable, one-tap scene buttons directly over the 3D viewport.
PyMOL scene commands
Section titled “PyMOL scene commands”You can also manage scenes from the command line:
# Store a new scene named 'pocket'scene pocket, store
# Recall a scenescene pocket, recall
# Update the active scenescene auto, update
# Move to next or previous scenescene auto, nextscene auto, previous
# Delete a scenescene pocket, delete
The Timeline Movie Studio
Section titled “The Timeline Movie Studio”RayMol’s docked Timeline transforms PyMOL’s frame transport into a visual composition editor:
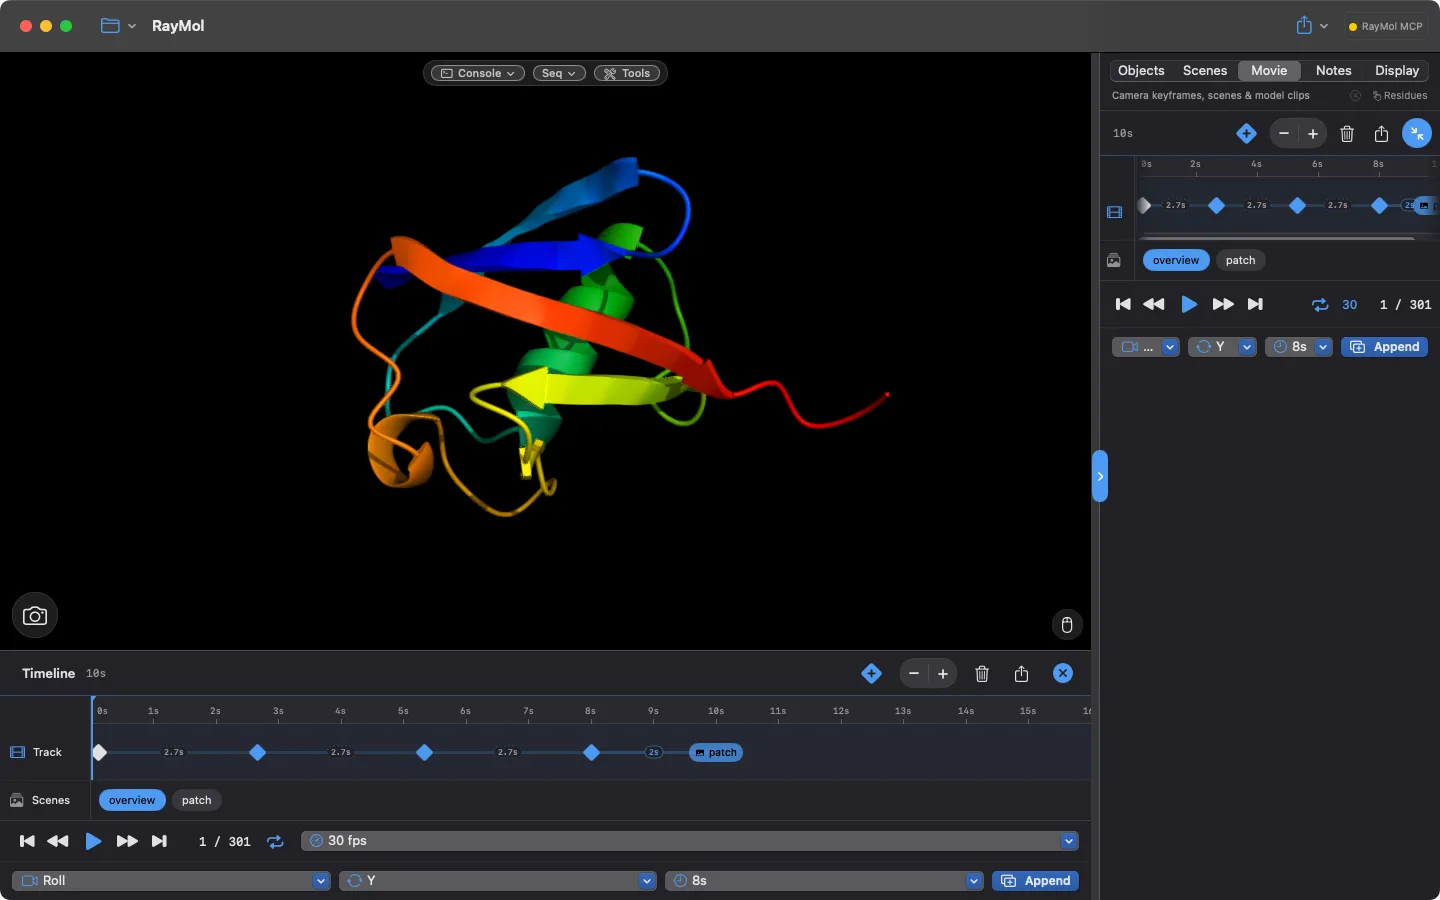 The Timeline movie studio: a Roll camera clip followed by a scene clip, with the Movie tab in the Inspector.
- macOS & iPad: Open the Movie tab in the inspector. Select the expand button to dock the full-width timeline below the 3D viewport (on iPad, this button works only in landscape orientation). On macOS, you can also choose Movie ▸ Edit Timeline (⌥⌘M) to open it.
- iPhone: The Movie tab is the timeline, formatted to fit compact screens.
Unified timeline tracks
Section titled “Unified timeline tracks”The timeline displays a fixed-scale time ruler (defaulting to 10 seconds across the screen) with a horizontal track hosting three types of items:
- Camera keyframes (◆): Diamond markers holding the exact camera view.
- Scene markers: Labeled capsules holding complete scene snapshots.
- Play-models clips: Rectangular blocks representing multi-state coordinate playback across NMR ensembles or MD simulations.
Timeline navigation and controls
Section titled “Timeline navigation and controls”- Scrub & Seek: Drag the playhead across the ruler or tap any point on the ruler to seek directly to that frame.
- Zoom the ruler: Use the
+and-zoom buttons on the header to scale the time ruler. - Add camera keyframe: Tap
+◆on the timeline header to capture the current camera view as a new keyframe at the end of the track. - Reorder items: Drag an item horizontally past its neighbors to reorder it; timing ripples automatically across the movie.
- Item menu: Right-click or long-press any keyframe or scene marker to seek to it, preview it, or delete it from the movie.
- Transitions: The labeled connectors between items control transition
durations (
0.5s,1s,2s,5s,8s) and easing (Smooth versus Linear). Total movie length is the sum of all transition durations.
Motion Presets (Make Movie)
Section titled “Motion Presets (Make Movie)”For rapid animation without manually keyframing, open Make Movie from the playback bar (Make, or Make Movie… in its menu; note that the playback bar is disabled while the timeline is empty). Build & Play replaces the current movie. To add a motion to the end of the timeline instead, pick it in the preset row at the bottom of the Movie tab and select Append.
Camera motions
Section titled “Camera motions”In Make Movie, you can choose from three camera motions:
- Roll: A continuous 360° spin around the selected camera axis (X,
Y, or Z).
Roll spins at a constant, linear speed matching desktop PyMOL, avoiding acceleration pauses every third of a turn.
- Rock: An oscillating back-and-forth swing through a configurable angle (such as 30°, 60°, 90°, or 120°) with natural easing at the turnaround points.
- Nutate: A cone-shaped wobbling motion that reveals 3D contours from multiple angles without fully tumbling the model.
Configure duration (4 s, 8 s, 16 s, 32 s), rotation axis, and whether
to create a Seamless loop, then select Build & Play.
By contrast, the preset row at the bottom of the Movie tab offers Camera Roll and Camera Rock with Append to add motions onto an existing timeline (it does not offer Nutate, 120° angles, or Seamless loop).
Multi-state ensembles (NMR & MD)
Section titled “Multi-state ensembles (NMR & MD)”When you load a structure containing multiple coordinate states (such as an NMR ensemble or an imported MD trajectory), you can animate through the models independently of camera motion using two different tools:
Make Movie ▸ States
Section titled “Make Movie ▸ States”Open Make Movie from the playback bar and select the States tab. Selecting Build & Play creates a movie that replaces the current movie:
- Loop: Plays forward from the start model to the end model (
1 → N) and restarts from model 1. - Sweep: Plays forward and then in reverse (
1 → N → 1) for an oscillating motion.
Options include a speed multiplier (1×, ½×, ⅓×, ¼×, ⅛×, 1⁄16×), a
pause duration at endpoints, and a Seamless loop toggle.
Play models preset (Movie tab)
Section titled “Play models preset (Movie tab)”In the preset row at the bottom of the Movie tab, configure the Play models item and select Append to add a model playback clip to the end of the timeline track. This clip configures a model range and a duration (without a speed multiplier):
- Sweep: Plays from start to end (
1 → N). - Loop: Plays forward and then in reverse (
1 → N → 1). - Lockstep: Moves all objects through the same model numbers together; objects with fewer states hold their last model.
Build a Movie from Scenes
Section titled “Build a Movie from Scenes”Assembling a movie from saved scenes produces rich, cinematic presentations where the camera, visual representations, materials, and lighting all transition together:
- Create several scenes representing distinct focus points or binding states
(for example,
Overview,BindingPocket,MutantSite). - In the Timeline, tap a scene in the Scenes row below the track to add it to the end, or switch to the Scenes tab in Make Movie.
- Set the duration per scene (Make Movie ▸ Scenes offers 2, 4, 8, or 12 s; the Movie tab’s Scene loop offers 2, 3, or 5 s).
- Turn on Loop in Make Movie ▸ Scenes if you want the movie to return smoothly to the first scene.
- In Make Movie, select Build & Play; in the timeline, start playback from the playback bar.
Animated transitions between scenes
Section titled “Animated transitions between scenes”During scene playback, RayMol smoothly blends between states:
Recalling a scene animates objects to their stored placements.
- Camera motion: The viewpoint, focal length, and magnification interpolate smoothly between keyframes.
- Object transforms: Objects shifted or rotated in Move mode (
⌃M) glide between their respective positions in each scene. - Lighting & atmosphere: Studio spot lights shift positions, colors, and intensities between scenes, and atmospheric haze and dust smoothly adjust.
- Render settings: Depth of field focal distance and aperture adapt fluidly as the camera approaches new targets.
- Representations & colors: Object representations and coloring cut in at the designated scene marker.
Export a Movie
Section titled “Export a Movie”RayMol can render and encode movies directly on your device without requiring
external tools like ffmpeg.
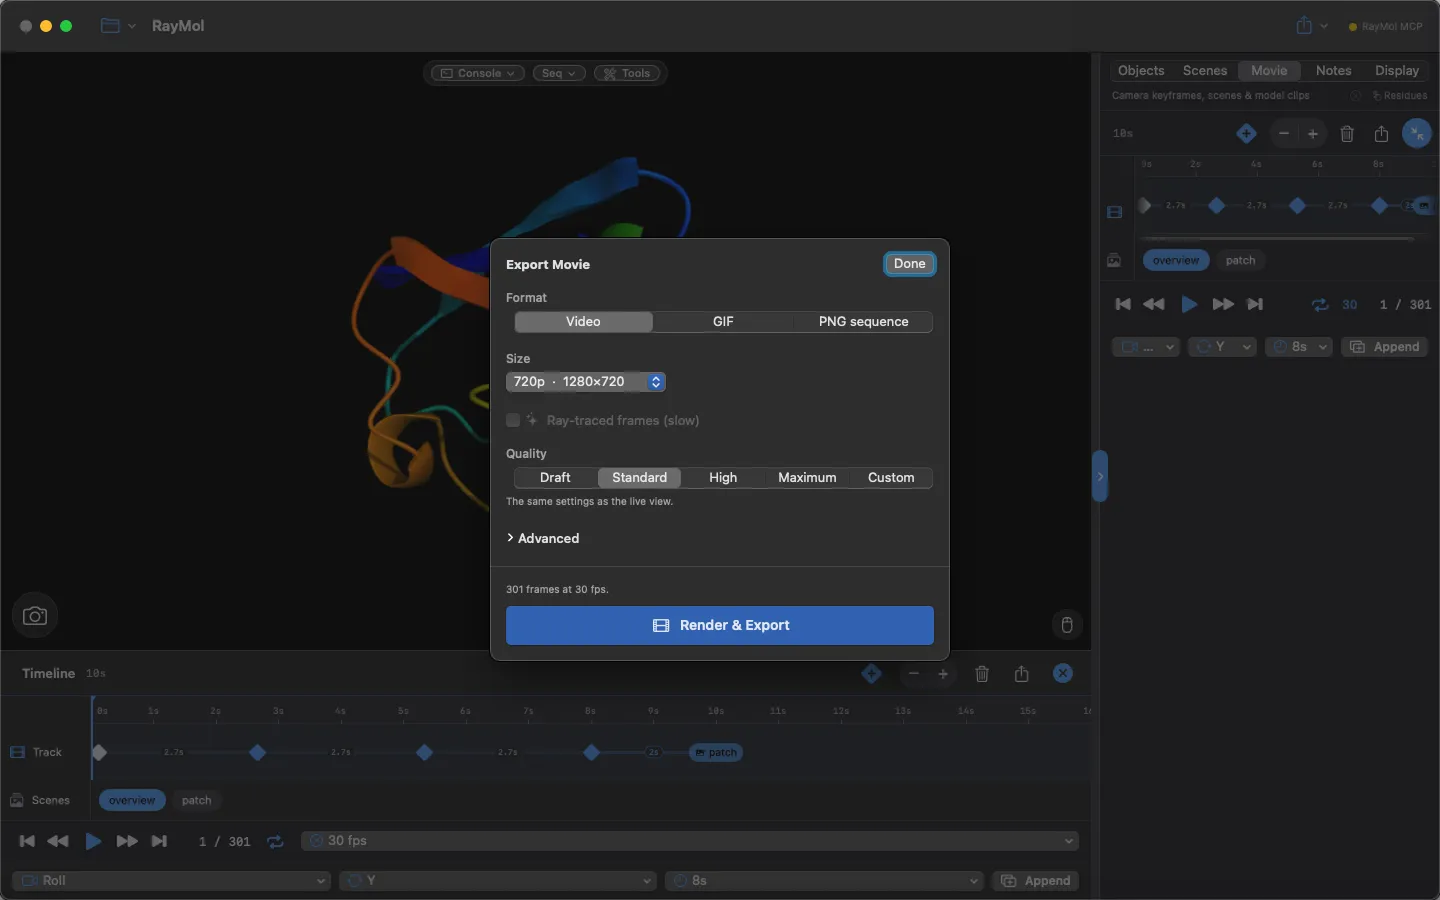 The Export Movie sheet.
Select the Export movie button (share icon) in the Timeline header (disabled while the timeline is empty), or choose Export Movie… from the playback bar’s menu. On iPhone and iPad you can also use Export ▸ Export Movie… in the toolbar.
Video, GIF, and image sequences
Section titled “Video, GIF, and image sequences”Select your desired output format:
- Video (
.mp4/.mov): Under Advanced ▸ Encoding ▸ Codec, choose from:- H.264: Maximum compatibility across web, presentations, and mobile
devices (encoded as
.mp4or.mov). - HEVC (H.265): High-efficiency compression providing smaller file sizes
at equivalent quality (writes
.mp4or.mov). - ProRes 422 (
.mov): Professional, visually lossless master format suitable for video editing suites (macOS only).
- H.264: Maximum compatibility across web, presentations, and mobile
devices (encoded as
- Animated GIF (
.gif): Looping animations optimized for documentation, chat applications, and web previews. - PNG sequence: Renders individual full-resolution frames into a new or empty folder, ideal for post-processing or external compositing pipelines.
Render quality presets
Section titled “Render quality presets”Offline movie export renders off-screen through the Metal pipeline, allowing much higher sampling than is possible at 60 fps live playback:
| Preset | MSAA | Surface & Cartoon Quality | RT Ambient Occlusion Samples | Reflections & DOF |
|---|---|---|---|---|
| Draft | Off | Live setting | Live setting | Live setting |
| Standard | Live setting | Live setting | Live setting | Matches interactive viewport |
| High | 4× | High cartoon/stick/sphere sampling | 128 rays/pixel | 16 reflection samples |
| Maximum | 4× | Maximum cartoon/stick/sphere tessellation and higher surface quality | 256 rays/pixel | 32 reflection samples, 2× supersampling |
| Custom | Configurable | Configurable | Configurable | Configurable |
Editing any setting under Advanced automatically switches the preset to Custom.
- Ray-traced frames (slow): When enabled, exports use off-screen ray tracing for shadows, ambient occlusion, and reflections. Ambient occlusion and reflection samples in the presets only apply when this toggle is on (off-screen frames trace at least 48 AO rays). When turned off, frames render without ray tracing even if ray tracing is enabled in the viewport.
Supersampling & resolution
Section titled “Supersampling & resolution”- Resolution: Choose a preset (360p–1440p, or 4K on Mac and iPad) or Custom…. Output size × supersampling can be at most 8192 px on macOS and 4096 px on iPhone/iPad.
- Supersampling (2× / 4×): Renders the frame at double or quadruple resolution before downsampling to output dimensions. This eliminates edge shimmer on fine stick representations, ribbon coils, and distant cartoon loops. Above the device maximum (8192 px on macOS, 4096 px on iOS/iPadOS), supersampling falls back to 1×.
- Bitrate (Advanced ▸ Encoding, H.264/HEVC only): Automatic, or 8–128
Mbit/s. Scripts can pass any value from 1–400 with
movie_export … bitrate=.
All export operations execute on a background thread so the interface remains responsive, and session settings are automatically restored when export finishes or is cancelled.
PyMOL Scripting Reference
Section titled “PyMOL Scripting Reference”You can script movies and playback using standard PyMOL commands:
# Define frame counts and coordinate statesmset 1 x120
# Store camera keyframesmview store, 1turn y, 120mview store, 41turn y, 120mview store, 81turn y, 120mview store, 120
# Re-interpolate at constant speed (power=0 eases at keyframes)mview reinterpolate, power=1
# Transport controlsmplaymstoprewindframe 30
Scripted movie export (movie_export)
Section titled “Scripted movie export (movie_export)”RayMol adds the movie_export command for automated rendering:
movie_export ~/Desktop/output.mp4, width=1920, height=1080, quality=high, codec=h264, fps=30Parameters include:
filename: Output file ending in.mp4,.mov,.gif, or an empty or new directory for a.pngsequence. The default codec for.movis ProRes, though.movcan also hold H.264 or HEVC.format: Export format (mp4,mov,gif, orpng).width,height: Output dimensions in pixels (default1920×1080).quality: Quality preset (draft,standard,high, ormaximum).codec: Video codec (h264,hevc, orprores).fps: Target frame rate (0uses sessionmovie_fps).bitrate: Target bitrate in Mbit/s (1–400, or0for automatic).supersample: Supersampling factor (1,2, or4;0uses preset default).ray:1ray-traces every frame;0renders without ray tracing.rt_samples: Ambient occlusion rays per pixel (-1keeps the preset’s value).first,last: Frame range to export (last=0means the final frame).
See Camera, Lens & Depth of Field for camera framing, Studio Lights & Atmosphere for lighting adjustments, and Rendering & Export for static image exports.