
Selecting, Measuring & Moving
RayMol combines interactive 3D picking with PyMOL’s algebraic selection engine. You can select atoms visually with a pointer or finger, build complex Boolean selections, take precise structural measurements, and reposition objects in space using an interactive 3D gizmo.
Selection Modes & Picking
Section titled “Selection Modes & Picking”When you click or tap in the 3D viewport, RayMol selects atoms based on the active Selection Mode.
Setting Selection Granularity
Section titled “Setting Selection Granularity”The selection mode controls the scope of a pick:
- Atoms: Selects the individual clicked atom.
- Residues: Selects the complete residue containing the picked atom.
- Chains: Selects the entire polypeptide or nucleic acid chain.
- Segments: Selects the segment (
segi) containing the atom. - Objects: Selects the entire molecular object.
- Molecules: Selects the covalently connected molecular entity.
- C-α: Selects only the alpha carbon atom of the picked residue.
To change the active mode:
- Open the selection-mode menu (hand icon showing the current mode, e.g. Residues) next to the clear (✕) button in the inspector header.
- On macOS, press
Tab(with the command line empty) to cycle forward through selection modes, orShift+Tabto cycle backward. - Alternatively, run the command:
(0 = Atoms, 1 = Residues, 2 = Chains, 3 = Segments, 4 = Objects, 5 = Molecules, 6 = C-α).set mouse_selection_mode, 1
Pre-Selection Preview & Hover Readout
Section titled “Pre-Selection Preview & Hover Readout”Before you click:
- Hover pre-selection preview: When hovering over a structure, RayMol highlights the targeted residue in cyan, confirming the picking target before committing.
- Hover readout chip: The top-right corner of the viewport displays the identifier of the atom, residue, chain, or object currently under the cursor.
Working with sele
Section titled “Working with sele”Visual picks automatically create or update a temporary selection named sele, displayed with pink halo indicators in the 3D viewport.
- Add to selection: Click unselected atoms or residues.
- Subtract from selection: Click an already selected atom or residue to remove it.
- Clear selection:
- Press
Esc(macOS): it first exits any active tool; otherwise the first press deselects and a second press deletessele. - Click the clear (✕) button in the inspector header.
- Right-click or long-press empty viewport space and choose Deselect all.
- Run
deselectordelete sele.
- Press
Box Select
Section titled “Box Select”For bulk selections, use Box Select to draw a 2D bounding marquee over the structure:
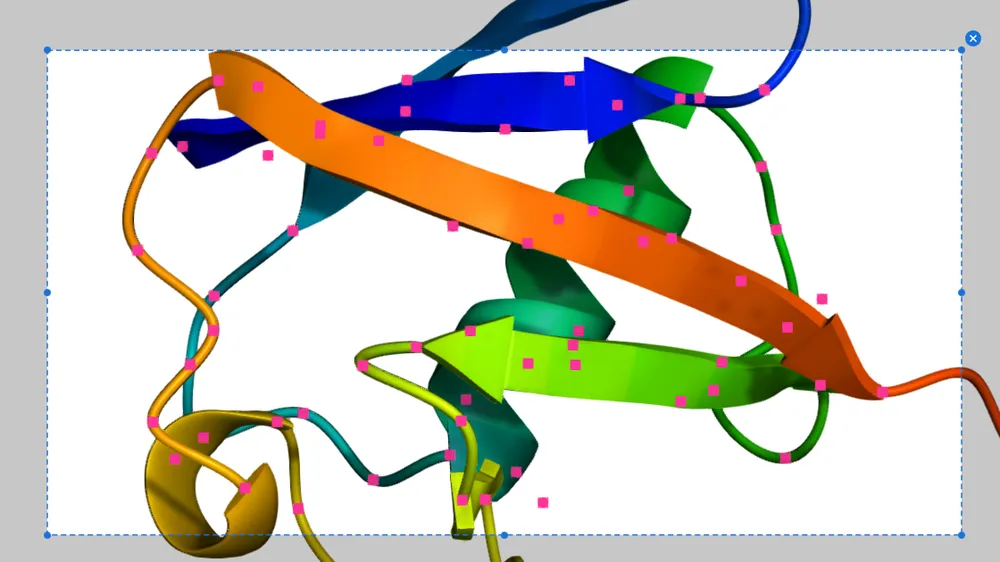 Box Select: drag a rectangle to select everything inside it.
- Activate Box Select: on macOS choose Tools ▸ Box Select (
⌃S); on any platform click the lasso icon in the Selections inspector header. - A rectangular overlay appears on the canvas. Drag its corners or edges to resize the box, or drag inside the marquee to reposition it.
- Every atom projected within the rectangle is immediately incorporated into
sele. - Close Box Select by clicking the ✕ at the box’s corner or the lasso button again, or by pressing
Escor⌃S(macOS). The selection stays.
Named Selections & the Selections Section
Section titled “Named Selections & the Selections Section”The Selections section of the Objects inspector lists all active selections (listed by name with their atom count, e.g. sele (42)).
Creating Selections with the Builder or Command Line
Section titled “Creating Selections with the Builder or Command Line”To define precise selections:
- Click the + button in the Selections section header to open the interactive Selection Builder.
- Use PyMOL’s command syntax in the console:
select binding_site, (resn LIG around 5.0) and not resn LIGselect active_chain, chain A and polymer.protein
Managing Selections
Section titled “Managing Selections”Each selection row provides standard A, S, H, L, and C buttons to show representations or apply colors specifically to selected atoms.
From a selection’s A (Action) menu, you can also:
- Remove Atoms: Delete the selected atoms directly from the parent object (
remove <selection>). - Copy to Object: Duplicate the selected atoms into a target object or create a new one (Copy to Object ▸ New Object…).
- Extract: Move atoms out of the original object into a separate object (Extract ▸ object). Widened extraction scopes are also supported:
- extend 1: Includes one bond neighbor beyond the selection.
- byres extend 1: the selection plus atoms one bond away, expanded to whole residues.
Measuring Distances, Angles & Dihedrals
Section titled “Measuring Distances, Angles & Dihedrals”RayMol provides visual, pick-driven measurement tools that render dashed lines and distance or angle readouts directly in the scene.
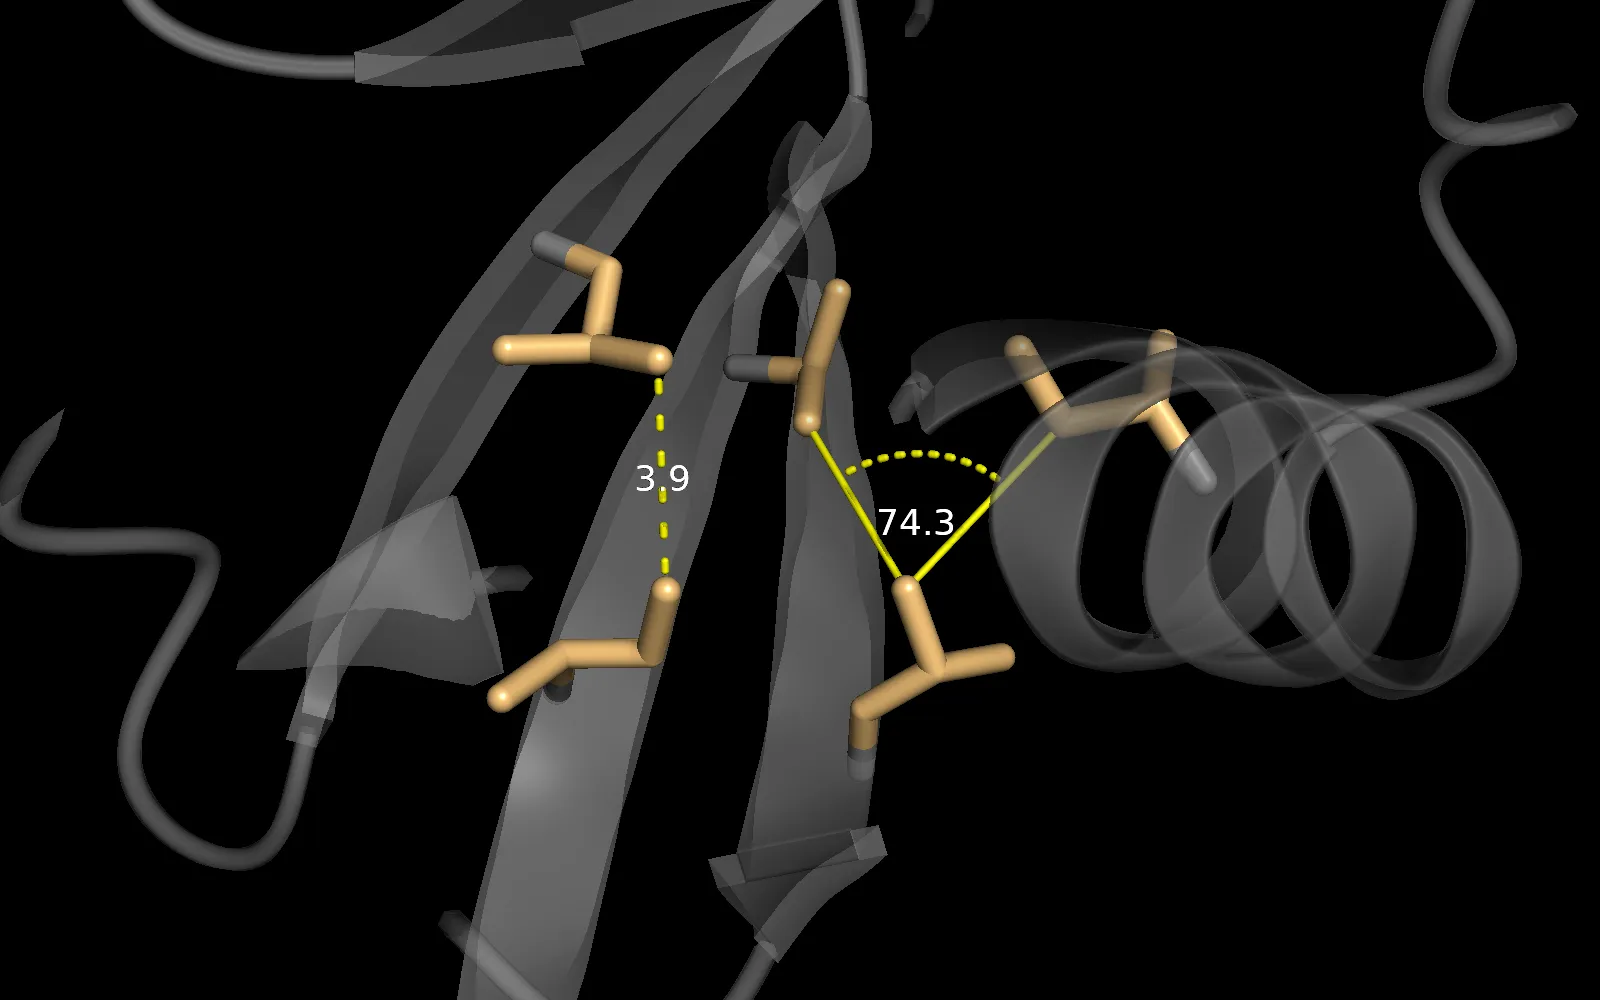 A distance (Ile3 to Leu67, 3.9 Å) and an angle (Val5–Leu15–Ile30, 74.3°) measured in the ubiquitin core.
- Activate measurement mode from Tools ▸ Measure Distances, the Tools rail pill, or by pressing
⌃E. - Choose the type from the Distance / Angle / Dihedral segmented control in the measurement bar:
- Distance: Pick 2 atoms. RayMol creates a
distXXobject showing the distance in Ångströms. - Angle: Pick 3 atoms. RayMol creates an
angXXobject showing the angle in degrees. - Dihedral: Pick 4 atoms. RayMol creates a
dihXXobject showing the torsion angle in degrees.
- Distance: Pick 2 atoms. RayMol creates a
- As you pick atoms, RayMol highlights them with the
seleindicator to guide your next pick. Once the required number of atoms is selected, the measurement is committed and displayed in the scene. - Click the trash icon in the measurement bar to delete all measurements (or
delete dist*for distances only).
Equivalent console commands:
distance dist01, 1ubq and chain A and resi 1 and name CA, 1ubq and chain A and resi 10 and name CAangle ang01, resi 1 and name N, resi 1 and name CA, resi 1 and name Cdihedral dih01, resi 1 and name N, resi 1 and name CA, resi 1 and name C, resi 2 and name NMoving Objects with the 3D Gizmo
Section titled “Moving Objects with the 3D Gizmo”To reposition or reorient an individual structure relative to the scene:
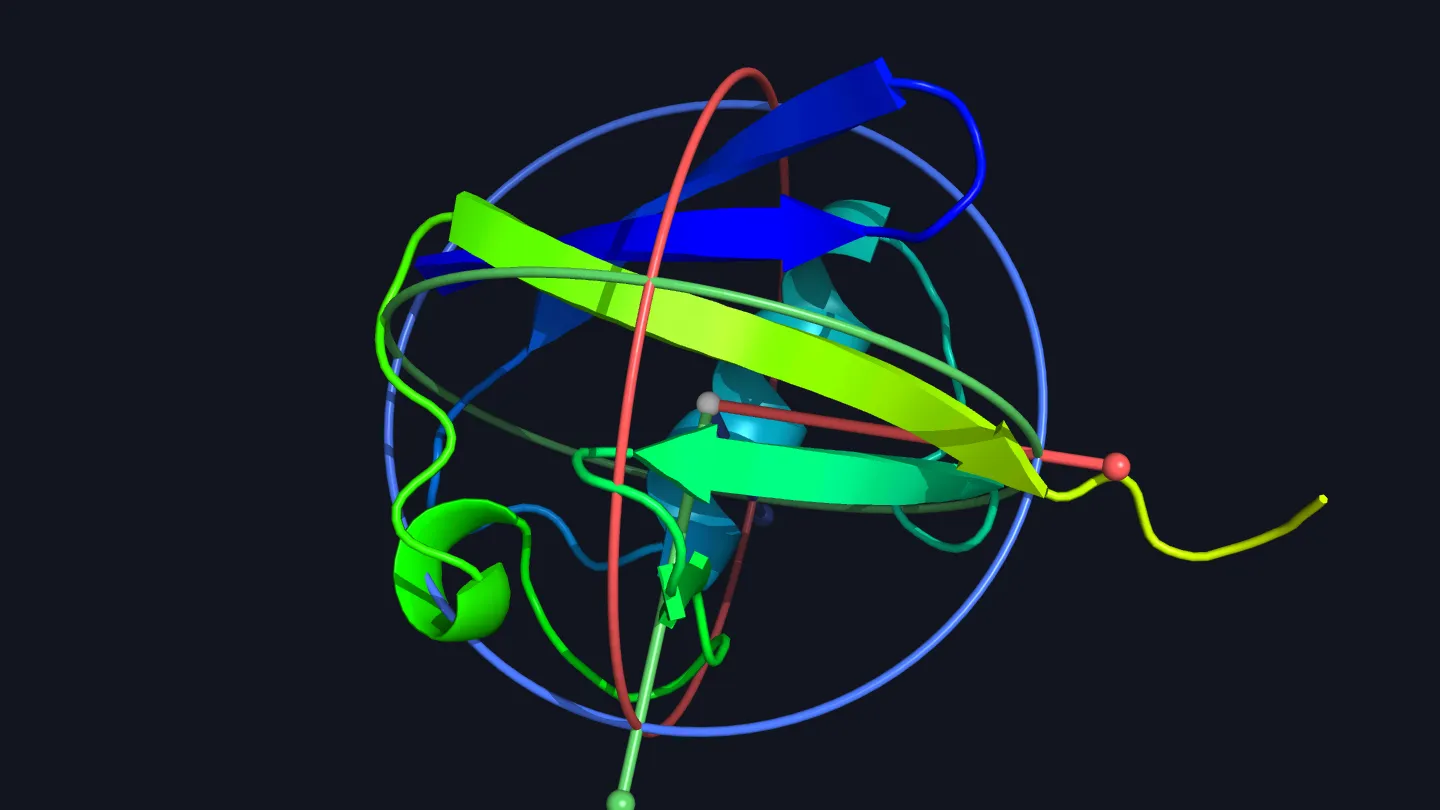 The Move gizmo: drag a ring to rotate or an arrow to translate.
- Enter Move mode via Tools ▸ Move Objects, the Tools rail pill, or by pressing
⌃M. - If multiple structures are loaded, select the target object from the dropdown in the Move bar.
- A 3D coordinate gizmo appears at the molecule’s center of mass:
- Axis Arrows (
x,y,z): Drag along red, green, or blue arrows to translate the structure along local coordinate axes. - Rotation Rings (
rx,ry,rz): Drag around the rings to rotate the structure about the corresponding axis. - Center sphere: drag the white sphere at the center to move freely in the screen plane.
- Axis Arrows (
Adjusting the Gizmo Frame
Section titled “Adjusting the Gizmo Frame”By default the gizmo sits at the center of mass, oriented by the molecule’s N- and C-termini (principal axes for non-protein objects). You can re-anchor its origin and tilt without moving the underlying structure:
- Click the adjust-frame button in the Move bar (tooltip: “Adjust the gizmo frame”), or hold
Shiftwhile dragging on macOS. - The gizmo turns gray. Dragging now moves and tilts the gizmo itself.
- Release
Shiftor deselect the gyroscope to resume moving the molecule around this custom pivot point. - Click the Reset Gizmo button to return the pivot to the molecule’s center of mass.
Resetting Object Transformations
Section titled “Resetting Object Transformations”Move-mode transformations update the object’s transform matrix non-destructively:
- Click the Reset Position button in the Move bar to snap the structure back to its original imported coordinates.
- Equivalent command:
matrix_reset <object_name>
- Press
Esc(macOS) or click the exit button to leave Move mode.
To learn more about RayMol keyboard navigation and shortcuts, see Keyboard Shortcuts & Startup Script.